An email campaign is a planned email sent to a chosen group of contacts to reach one goal, such as a sale or a win-back. This guide shows how to create one in Adflipr, an email marketing platform for Shopify and WooCommerce stores. For the campaign types and overall strategy, read our guide to email marketing campaigns.
Quick answer: To create an email campaign, create the campaign, then choose the sender, audience, subject line with preview text and template, and send or schedule it. Audit the email first. It takes 30 to 60 minutes.
Before You Start
- Pick one goal. For example, 20 repeat orders from customers who bought in the last 60 days. One email, one goal, one main button.
- Get consent. Only email people who agreed to hear from you. Grow your email list with popups and forms.
- Connect your store. Adflipr connects to Shopify and WooCommerce. Most stores are connected within 5 to 10 minutes.
- Authenticate your domain and add a sender. In Adflipr, go to Settings, add your domain, and add the DNS records. Then add a sender name and email, and verify it with the one-time code (OTP) we send. See how to authenticate your domain and how to add a sender.
This sets up SPF, DKIM and DMARC. Since February 2024, Google and Yahoo require this from bulk senders, along with one-click unsubscribe and a spam complaint rate under 0.3%.
How Do You Create an Email Campaign? 6 Steps
Watch the walkthrough, then follow the steps below.
Step 1: Create the Campaign
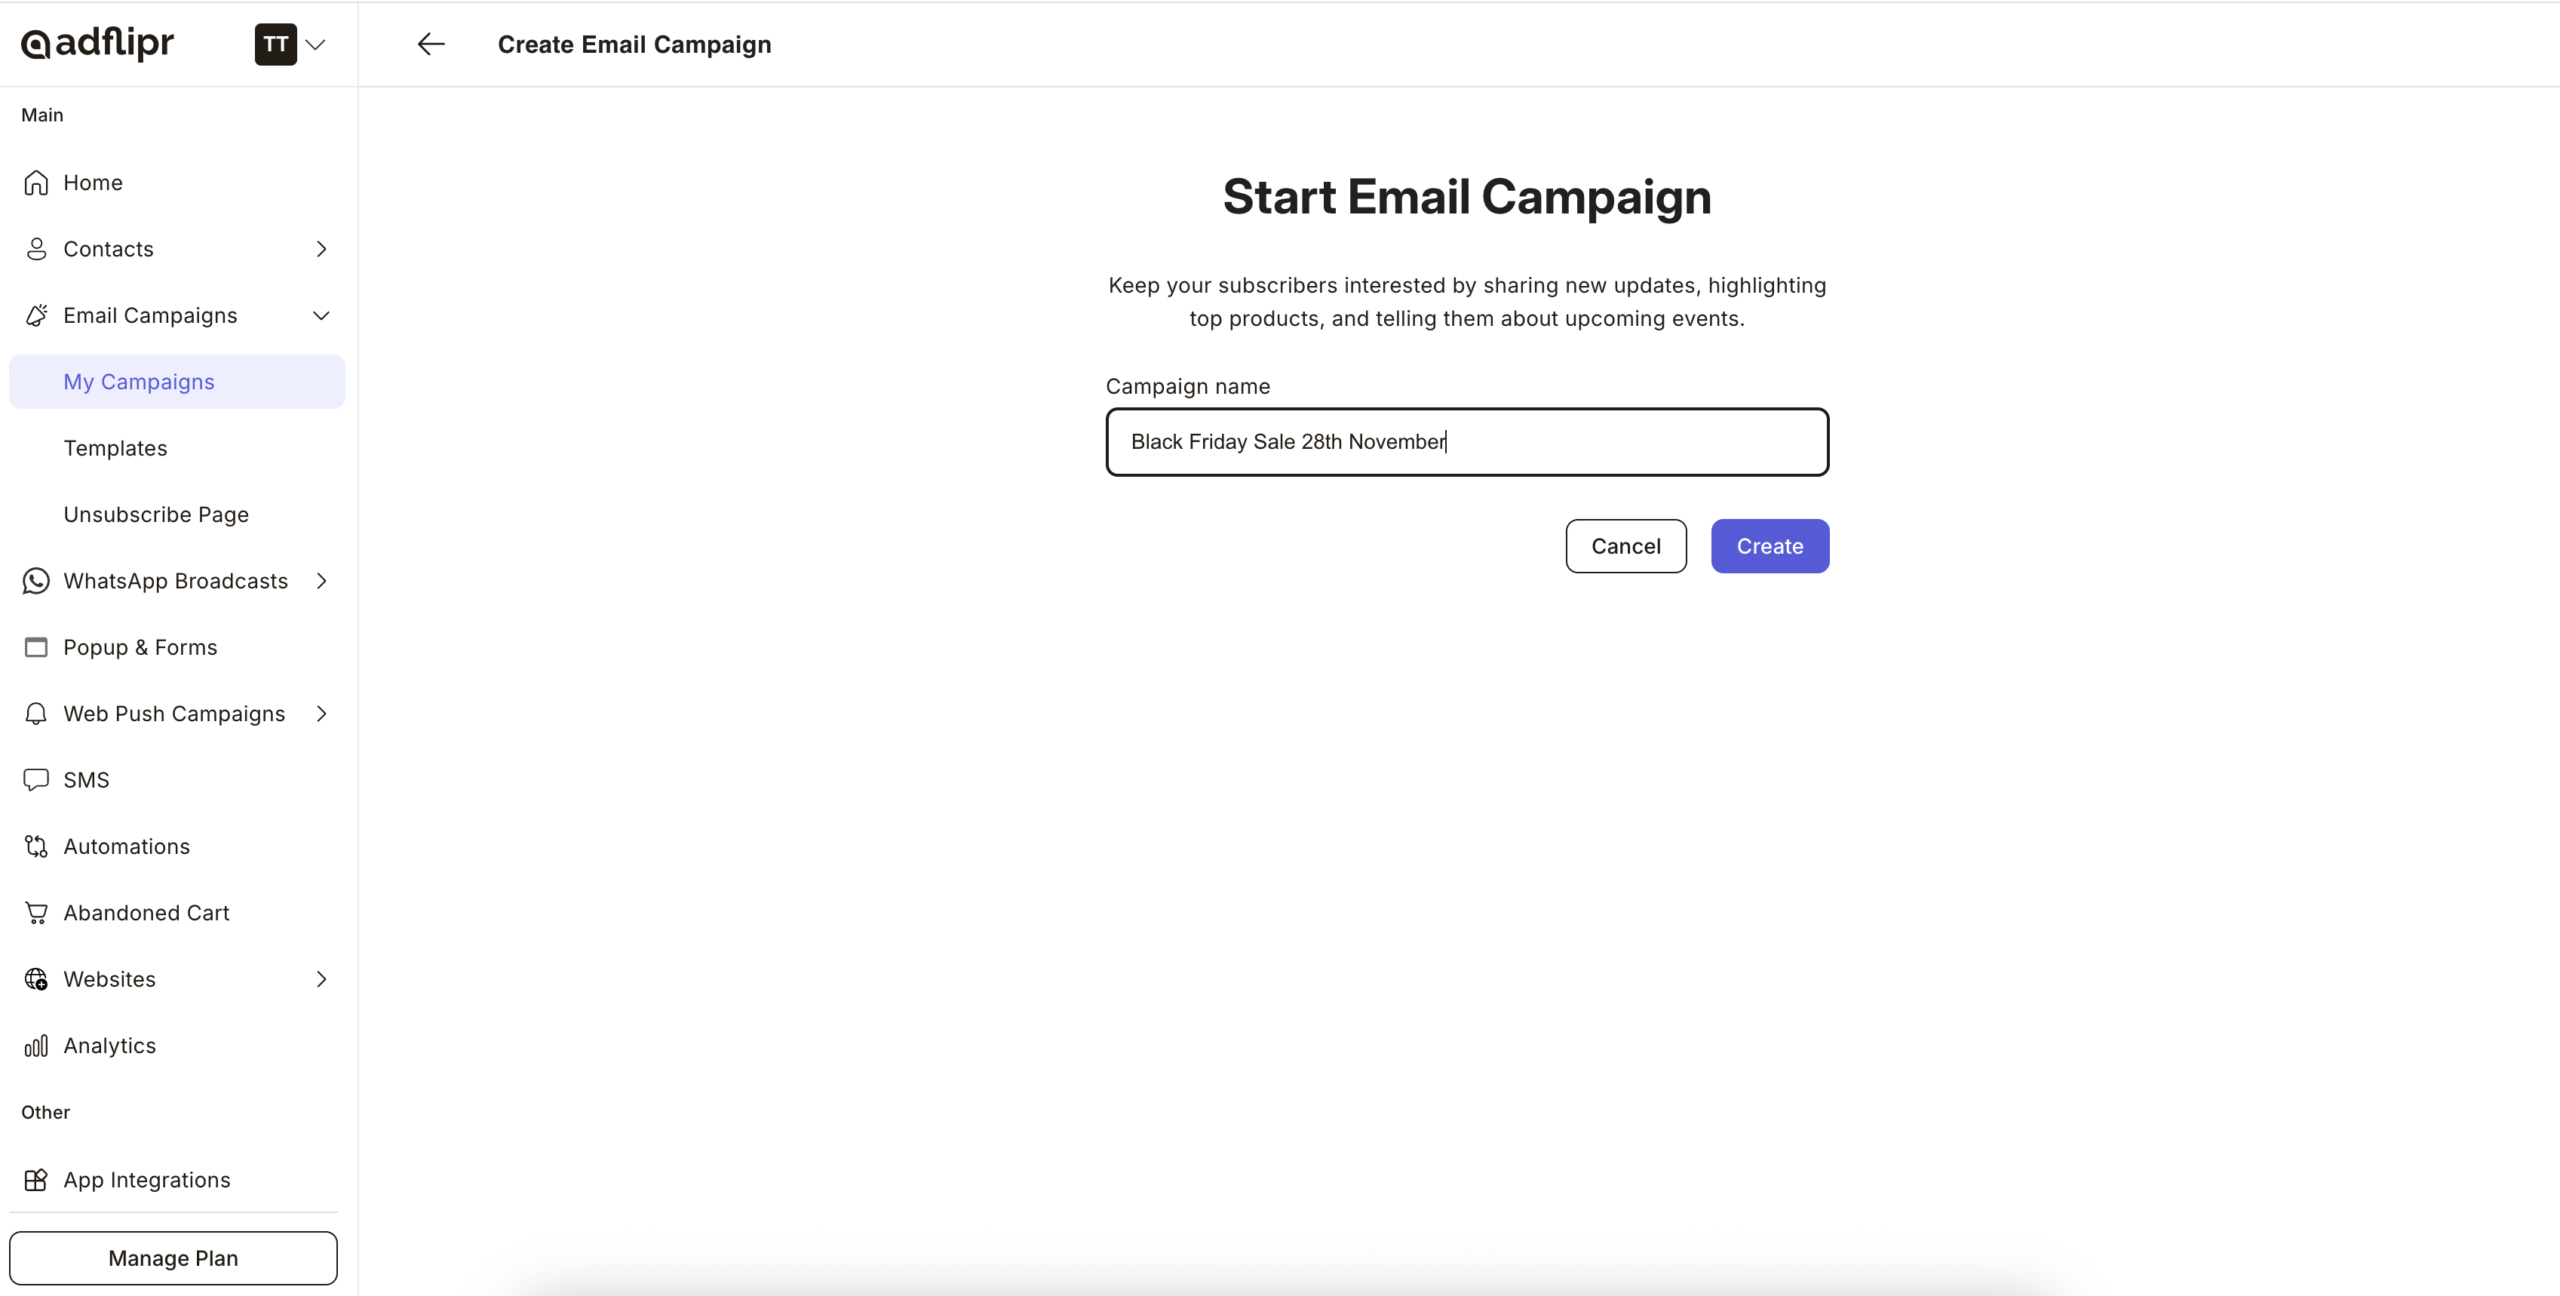
Start a new email campaign and give it a clear name that shows the goal and audience, such as “Winter sale: past buyers”.
Step 2: Choose the Sender
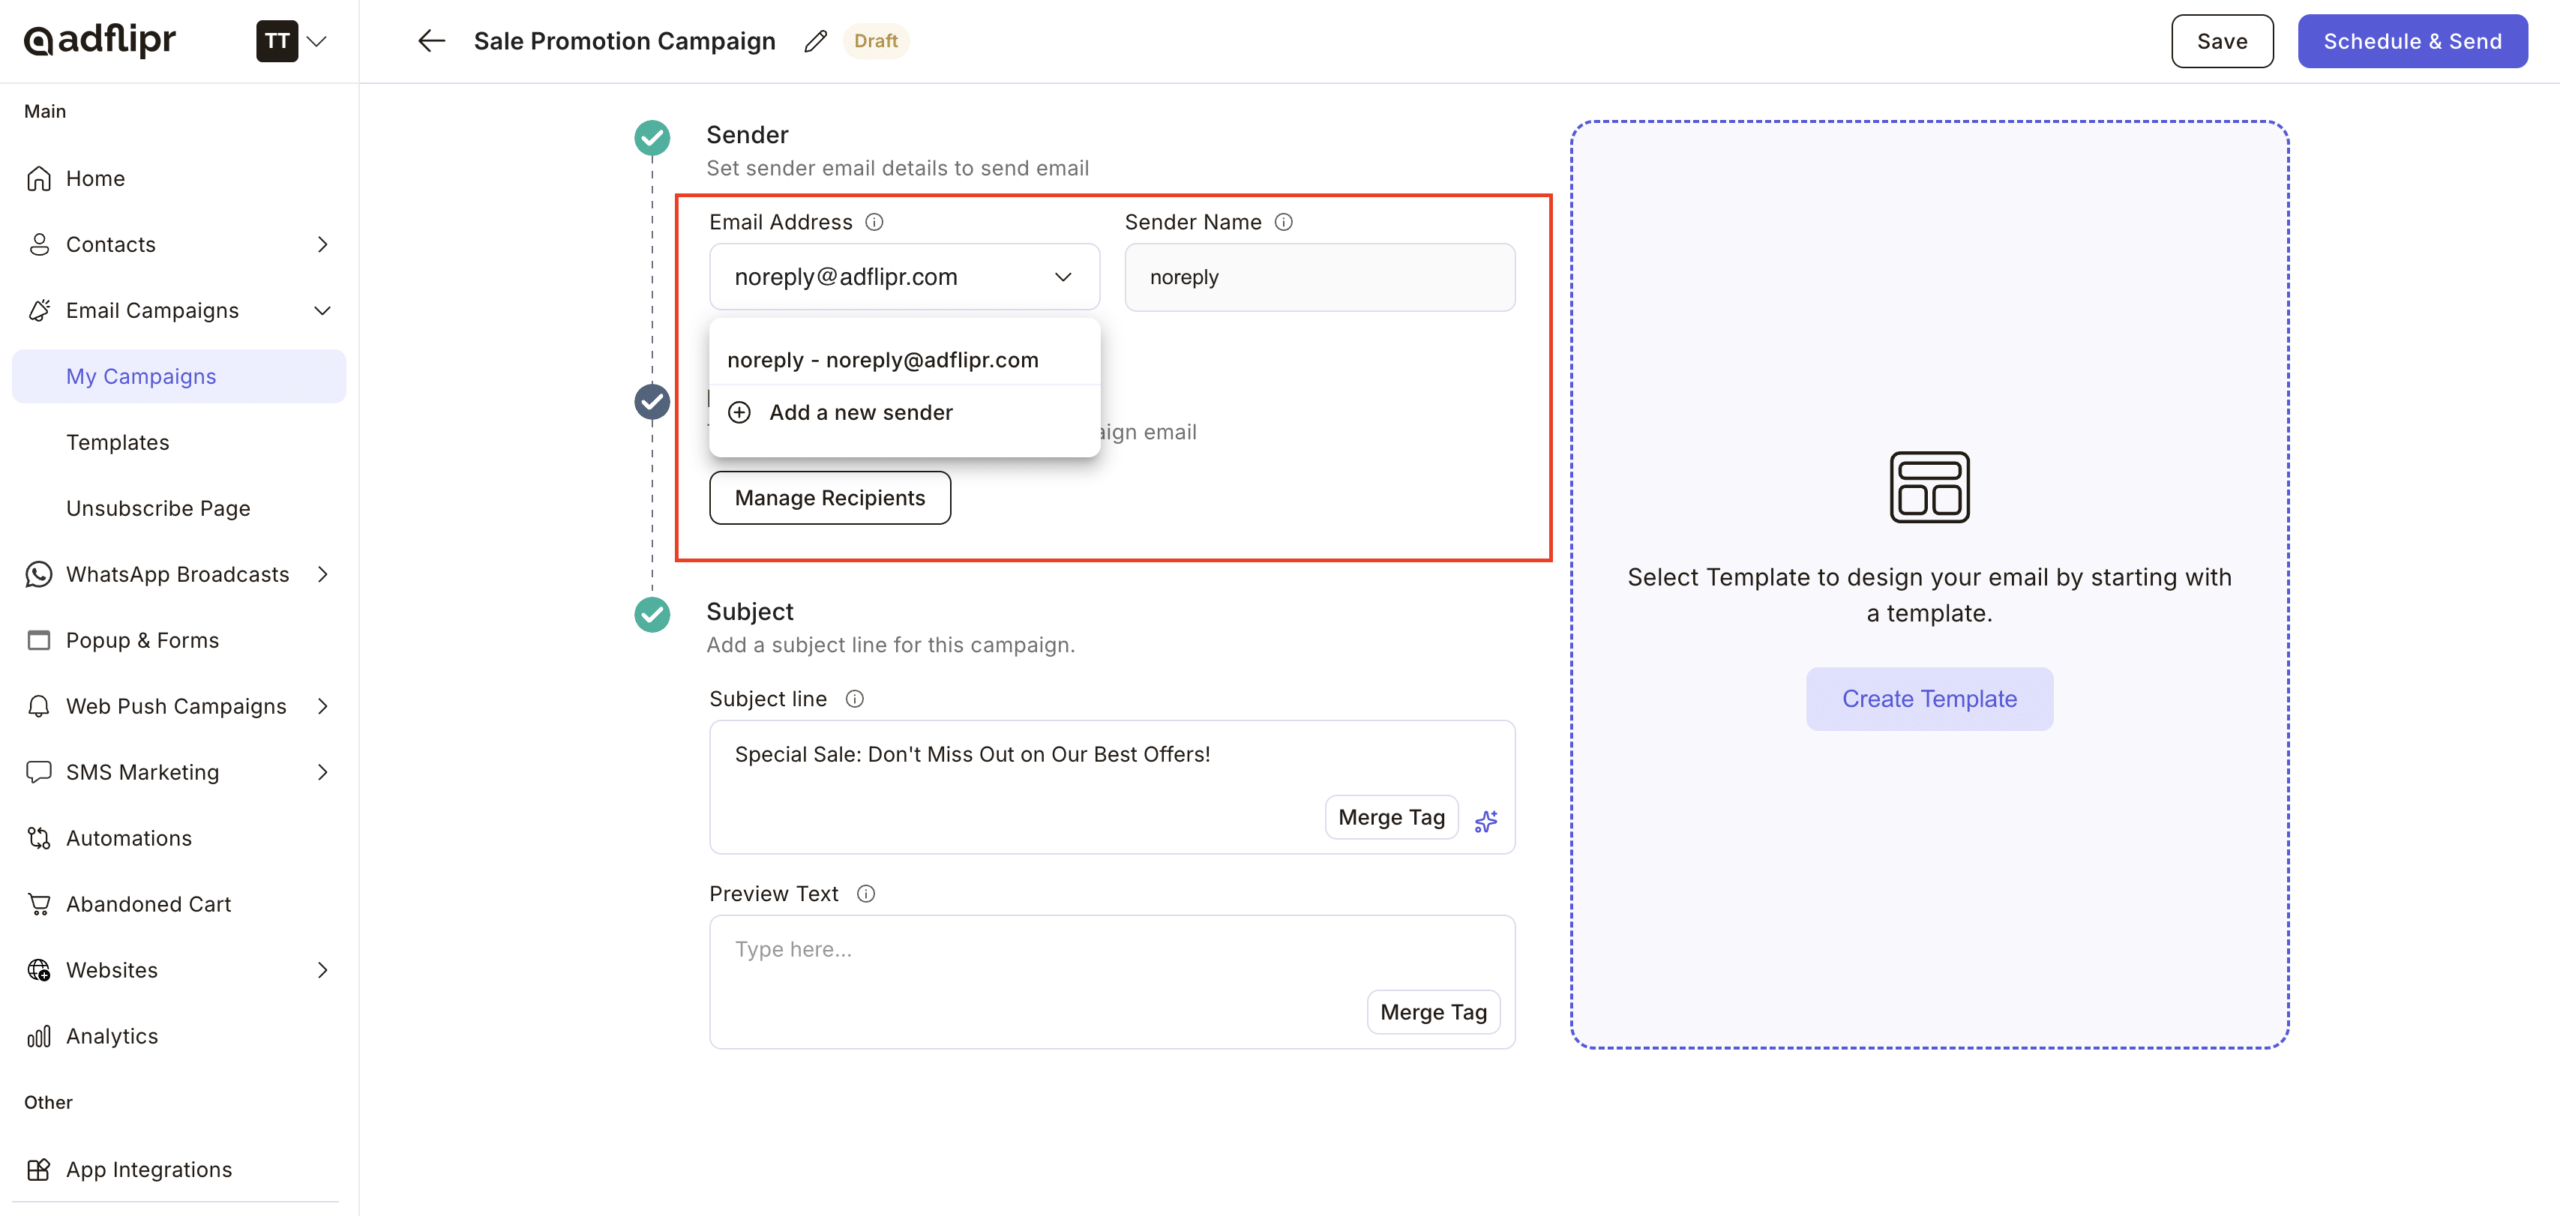
Select the sender name and email address your customers will see, and add a reply-to address so replies reach you.
Step 3: Choose the Audience
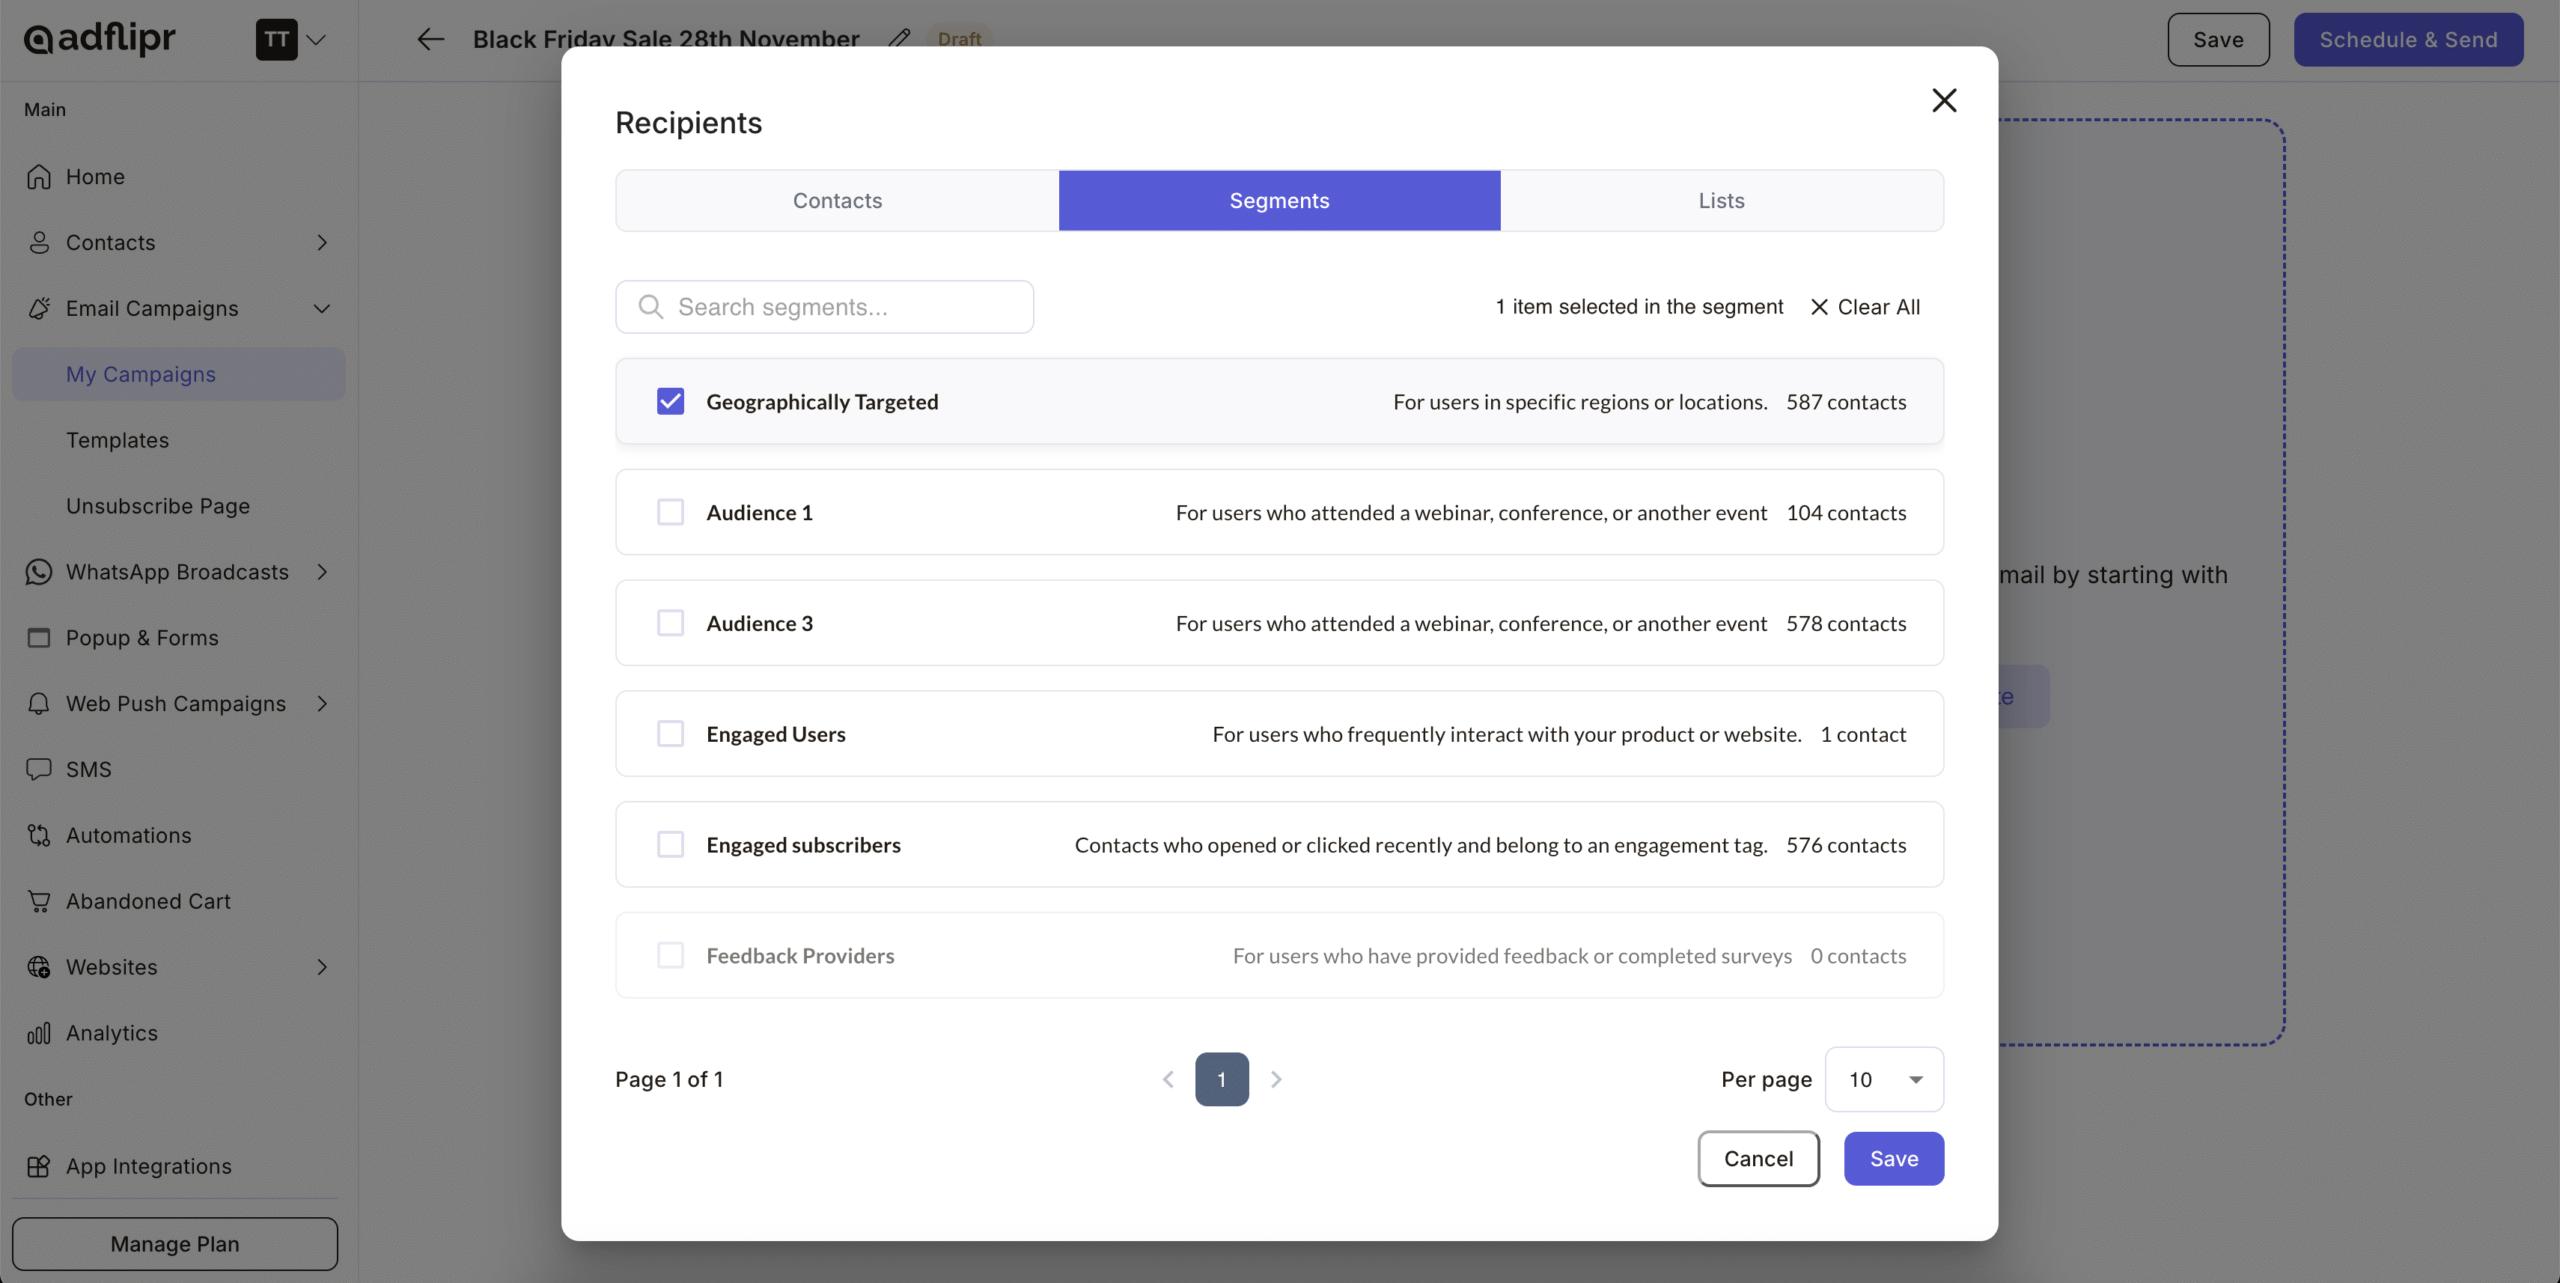
Select the list or segment that should get the campaign. Segments usually work better than sending to everyone.
Step 4: Add the Subject Line and Preview Text
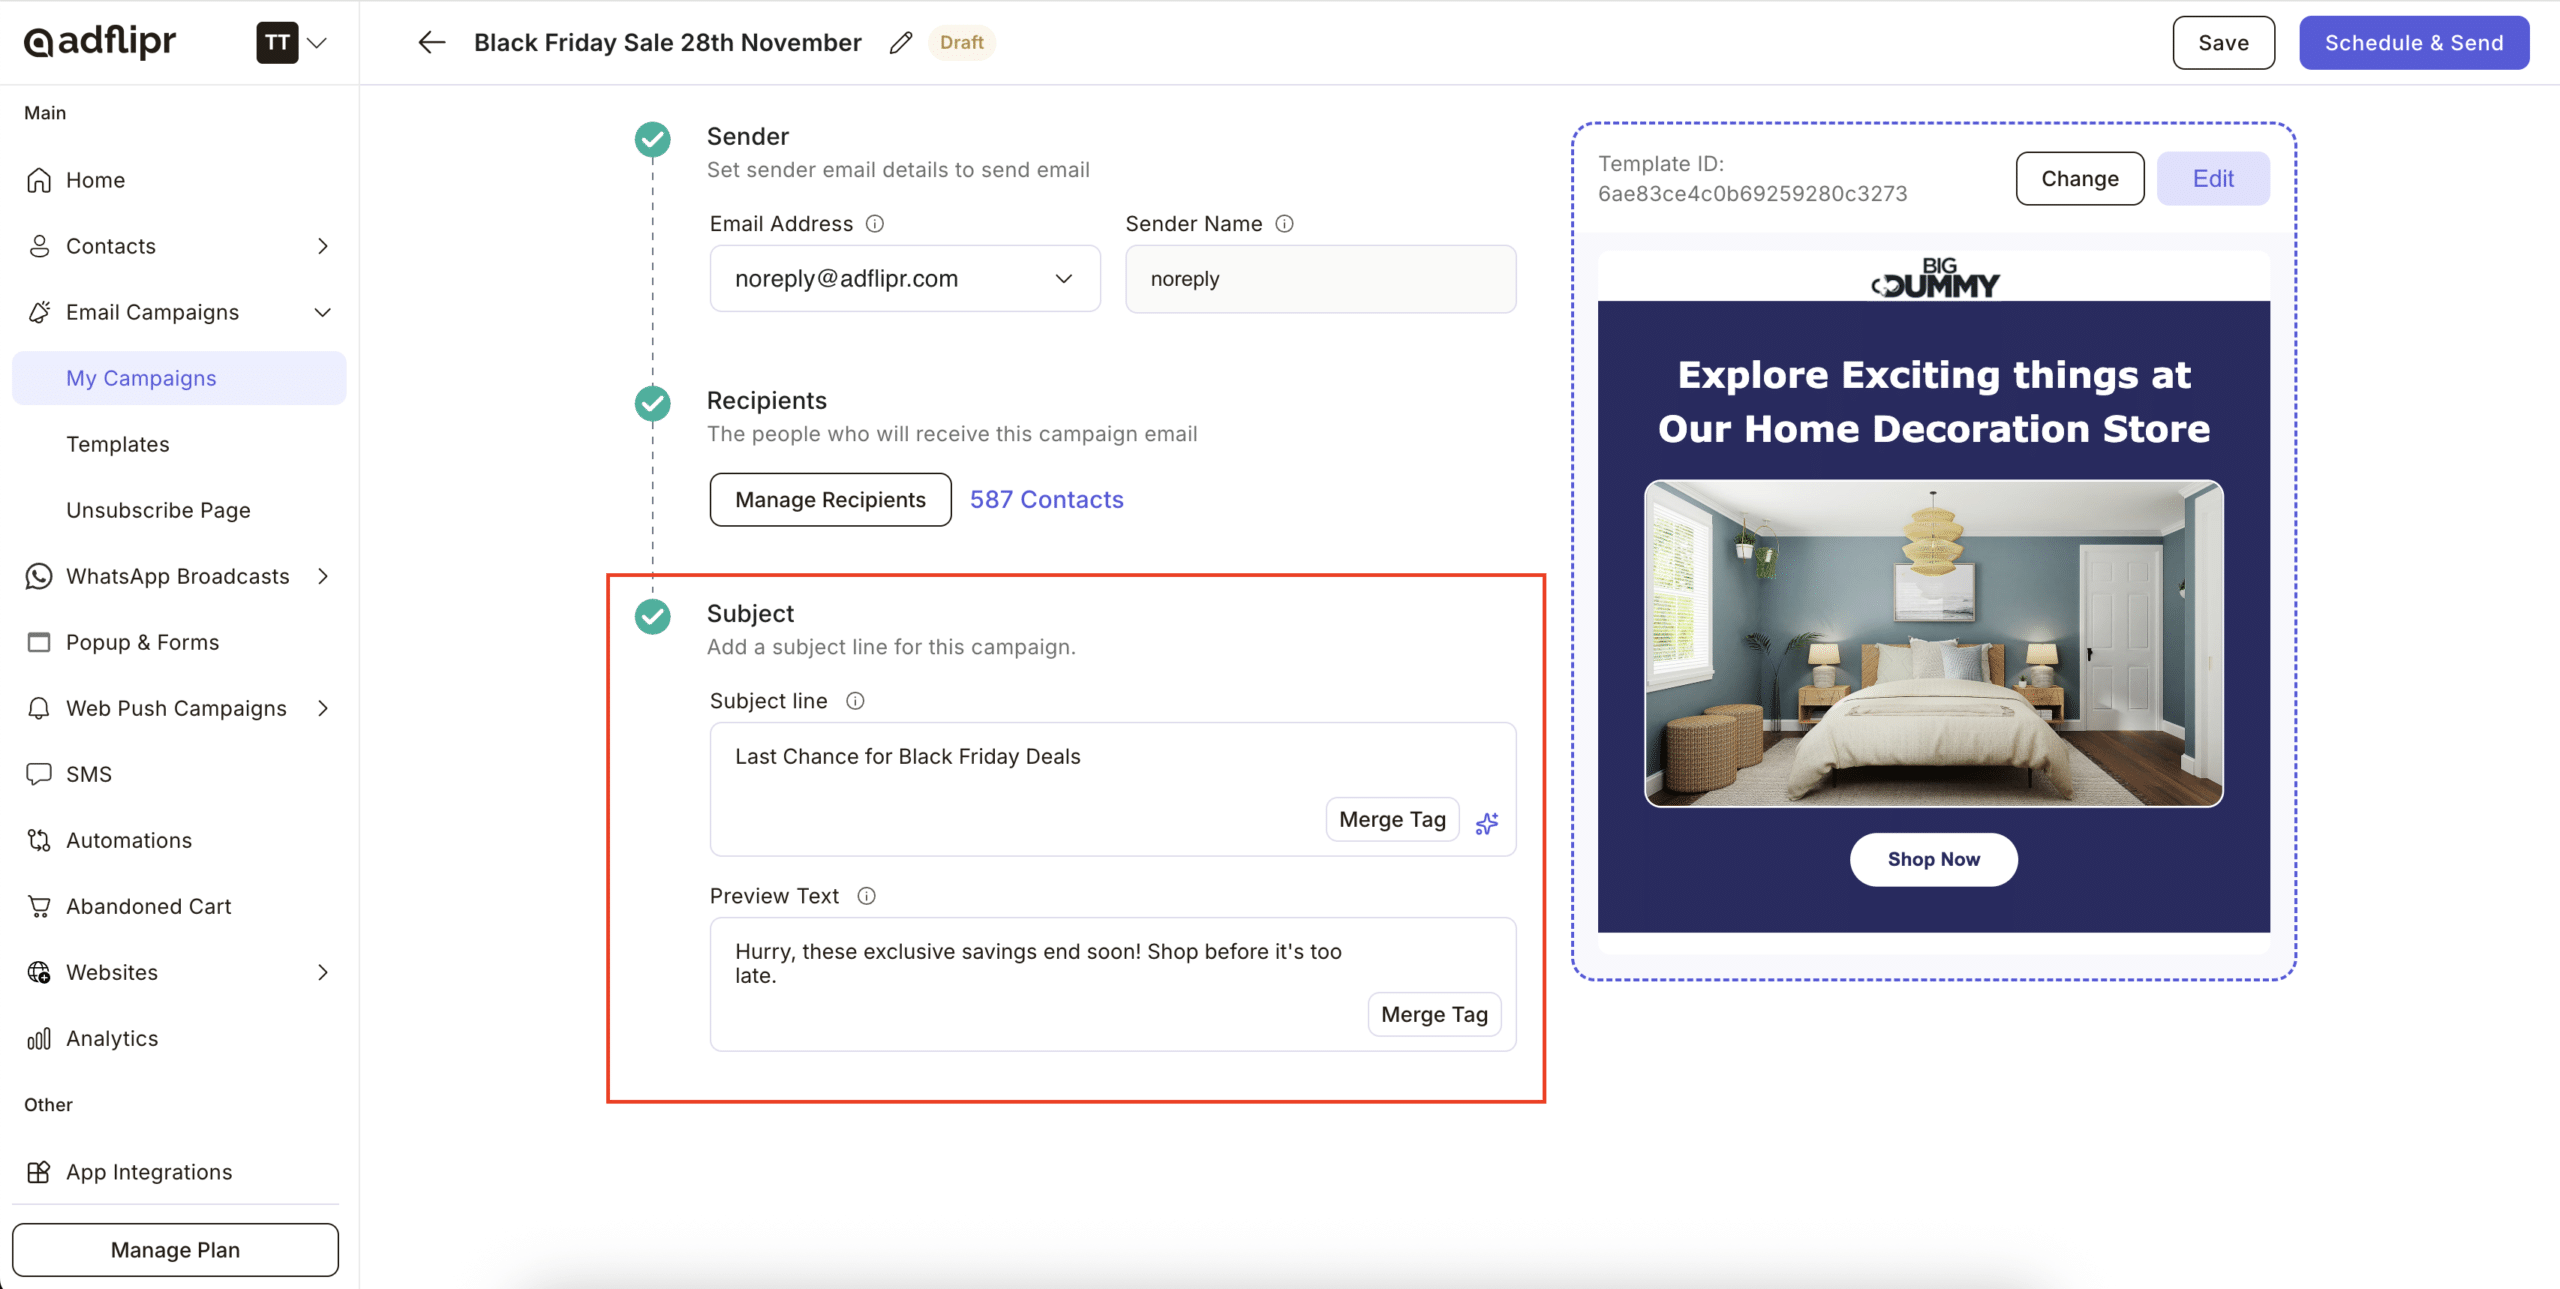
Write a short subject line that states the benefit, then add preview text that continues it.
Example: Subject “Your cart is waiting, plus free shipping today”. Preview “Complete your order before the offer ends.”
Need ideas? Try the subject line generator or read email sale subject lines.
Step 5: Choose the Template
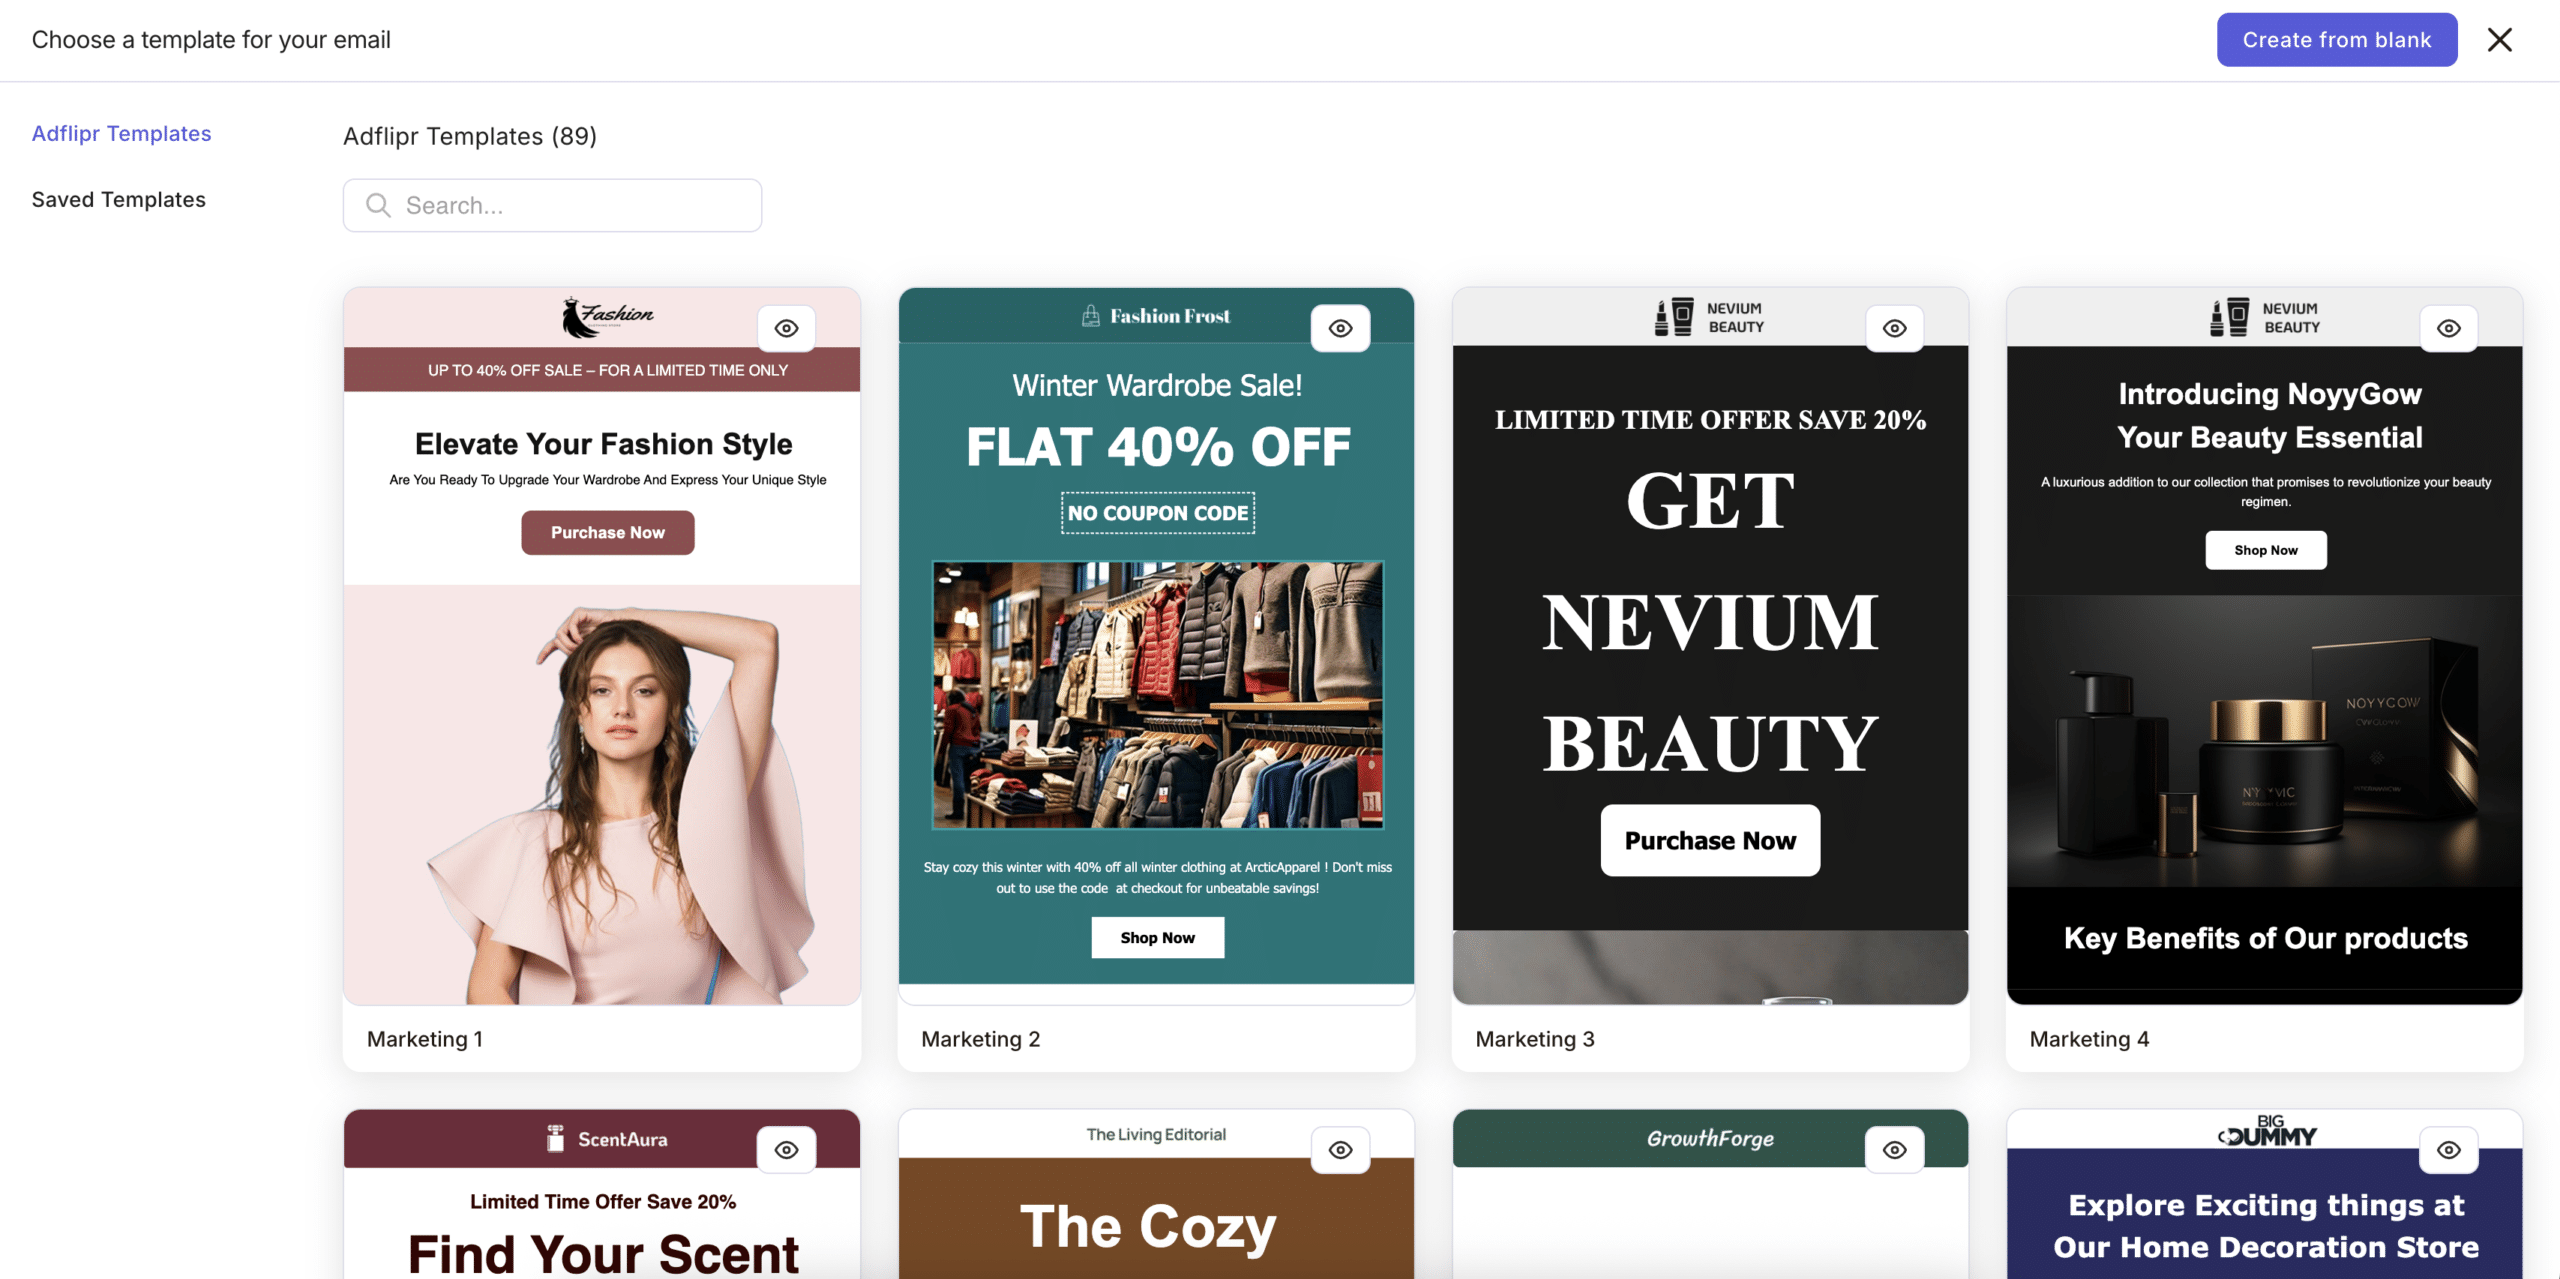
Pick a template in the email builder, add your logo and a clear button, and save. To show items from your store, drag in the product block, which pulls in images and prices automatically. Need a discount? Create a coupon in the builder.
Adflipr tip: save your logo and footer as reusable blocks, and use the live preview as you design. For design tips, see how to create custom email templates.
Step 6: Send or Schedule
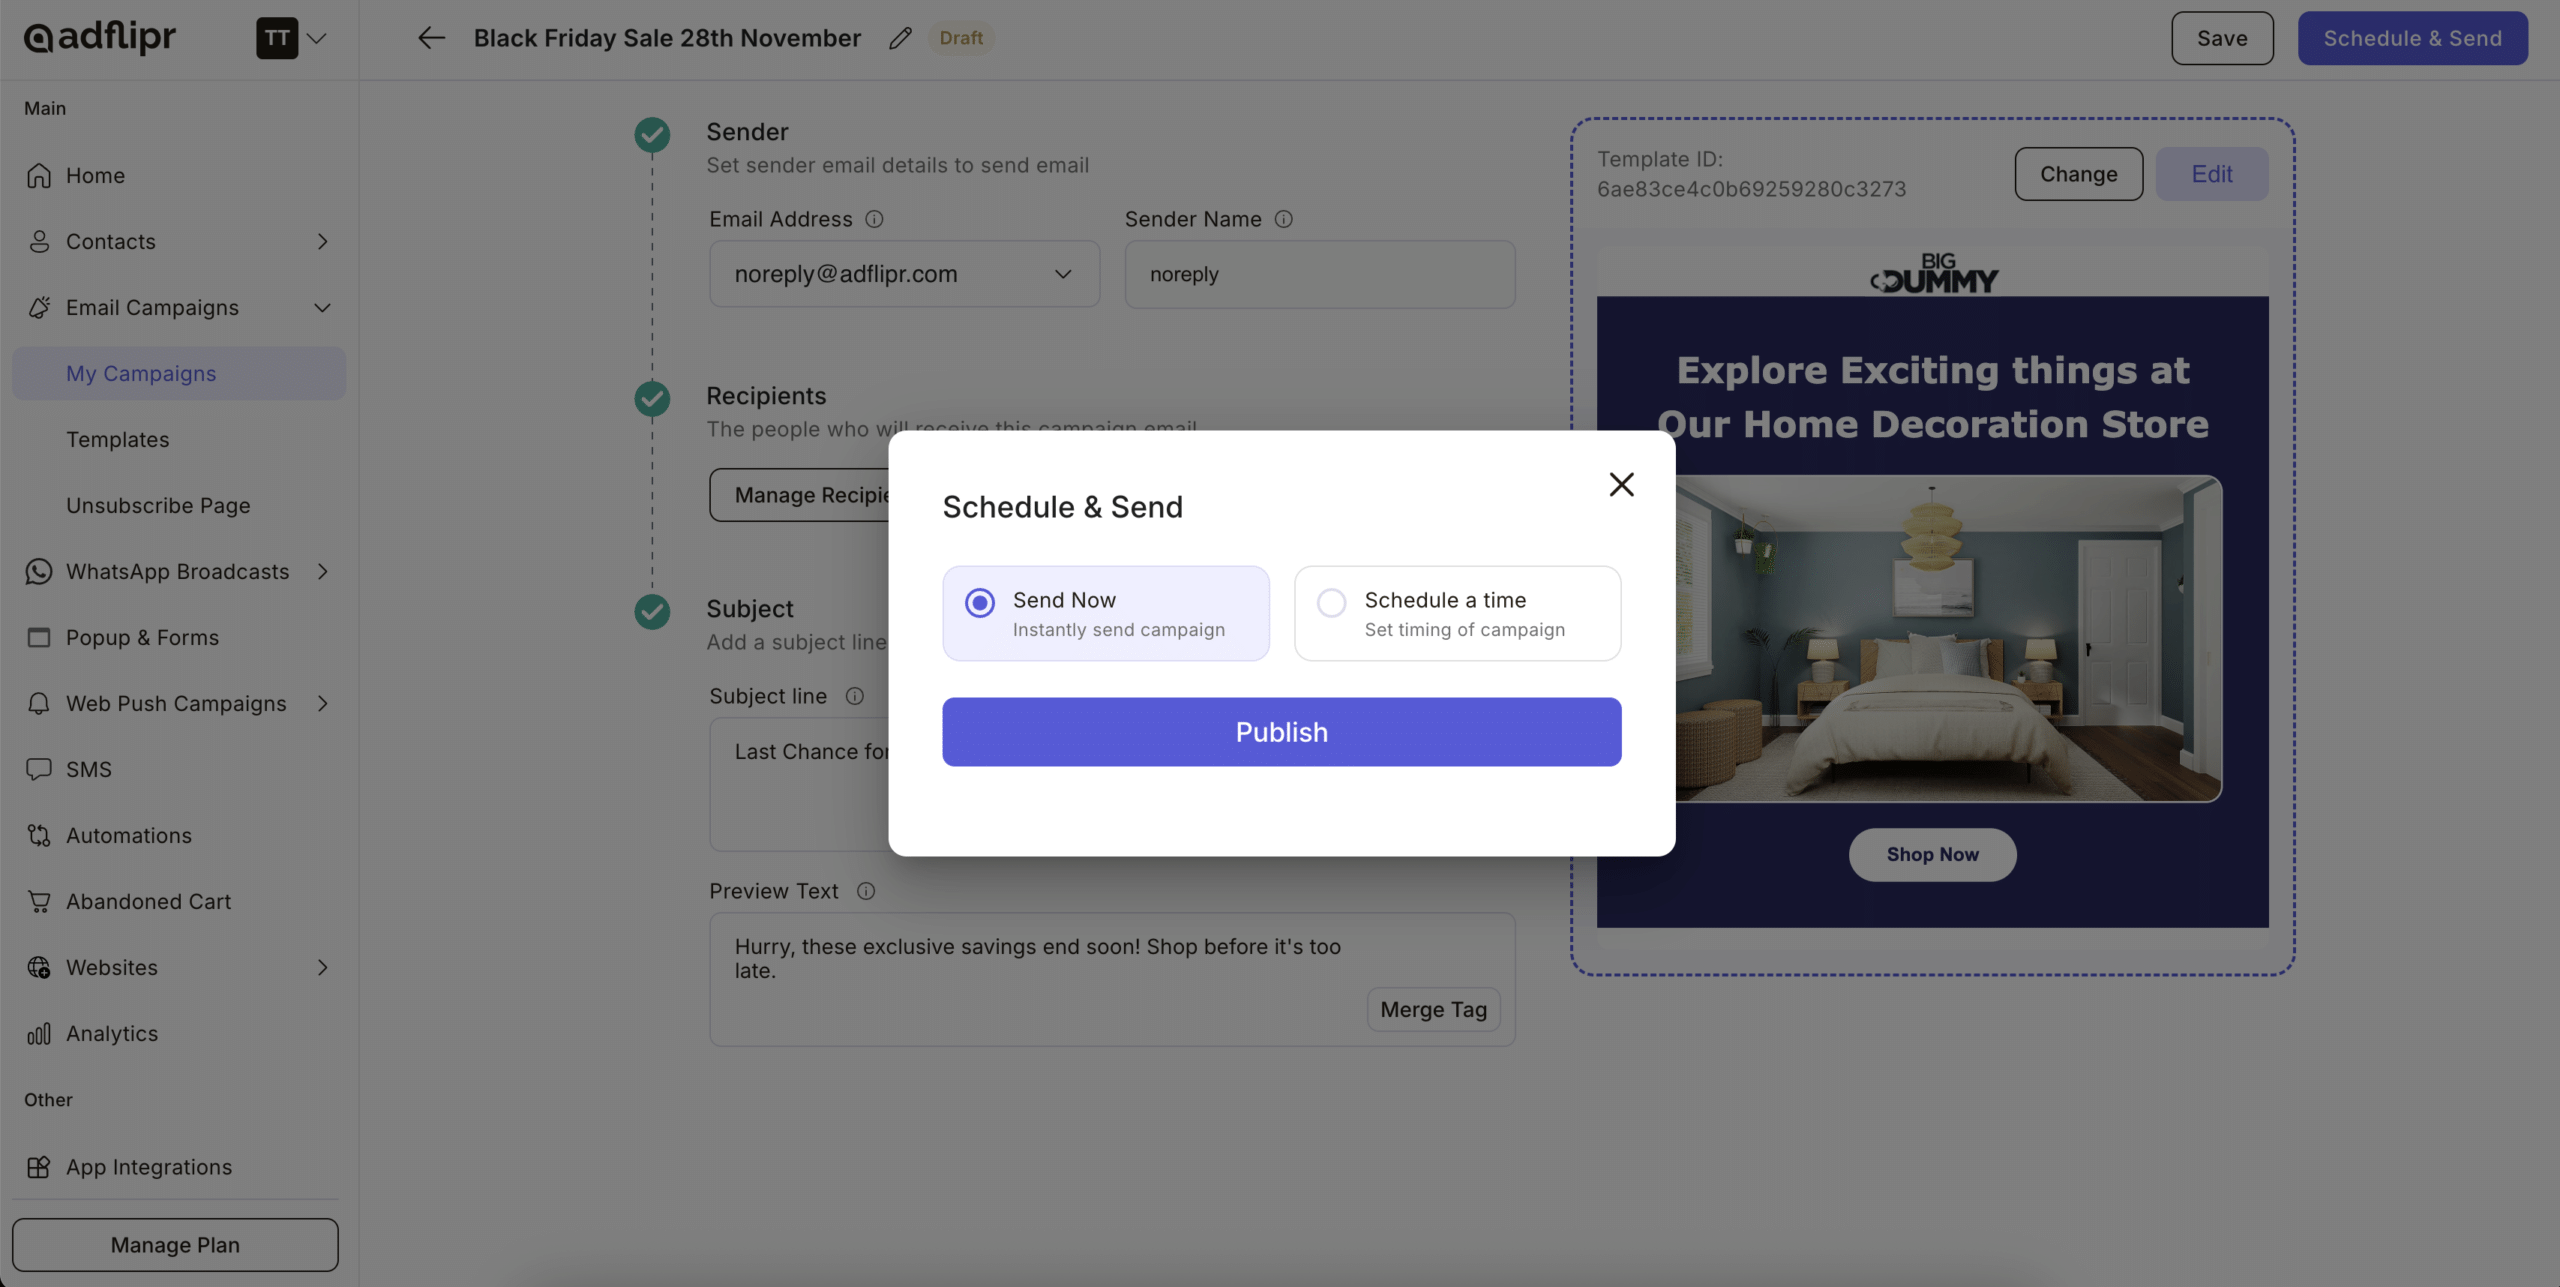
Audit the email (see below), then click Send or Schedule. Choose to send the campaign now, or schedule it to go out at a later time. Scheduling is part of the Premium plan.
Email Campaign Setup at a Glance
| Step | What you choose | Result |
|---|---|---|
| 1. Create the campaign | A clear campaign name | Easy to find and track later |
| 2. Sender | Sender name, email address and reply-to | Customers see a name they recognize |
| 3. Audience | A list or segment | The right people get the email |
| 4. Subject line and preview text | A short, benefit-led line | A reason to open |
| 5. Template | A template, logo, button and products | A branded, ready-to-send email |
| 6. Send or schedule | Send now, or pick a later time | The campaign goes out when you choose |
Audit Your Email Before Sending
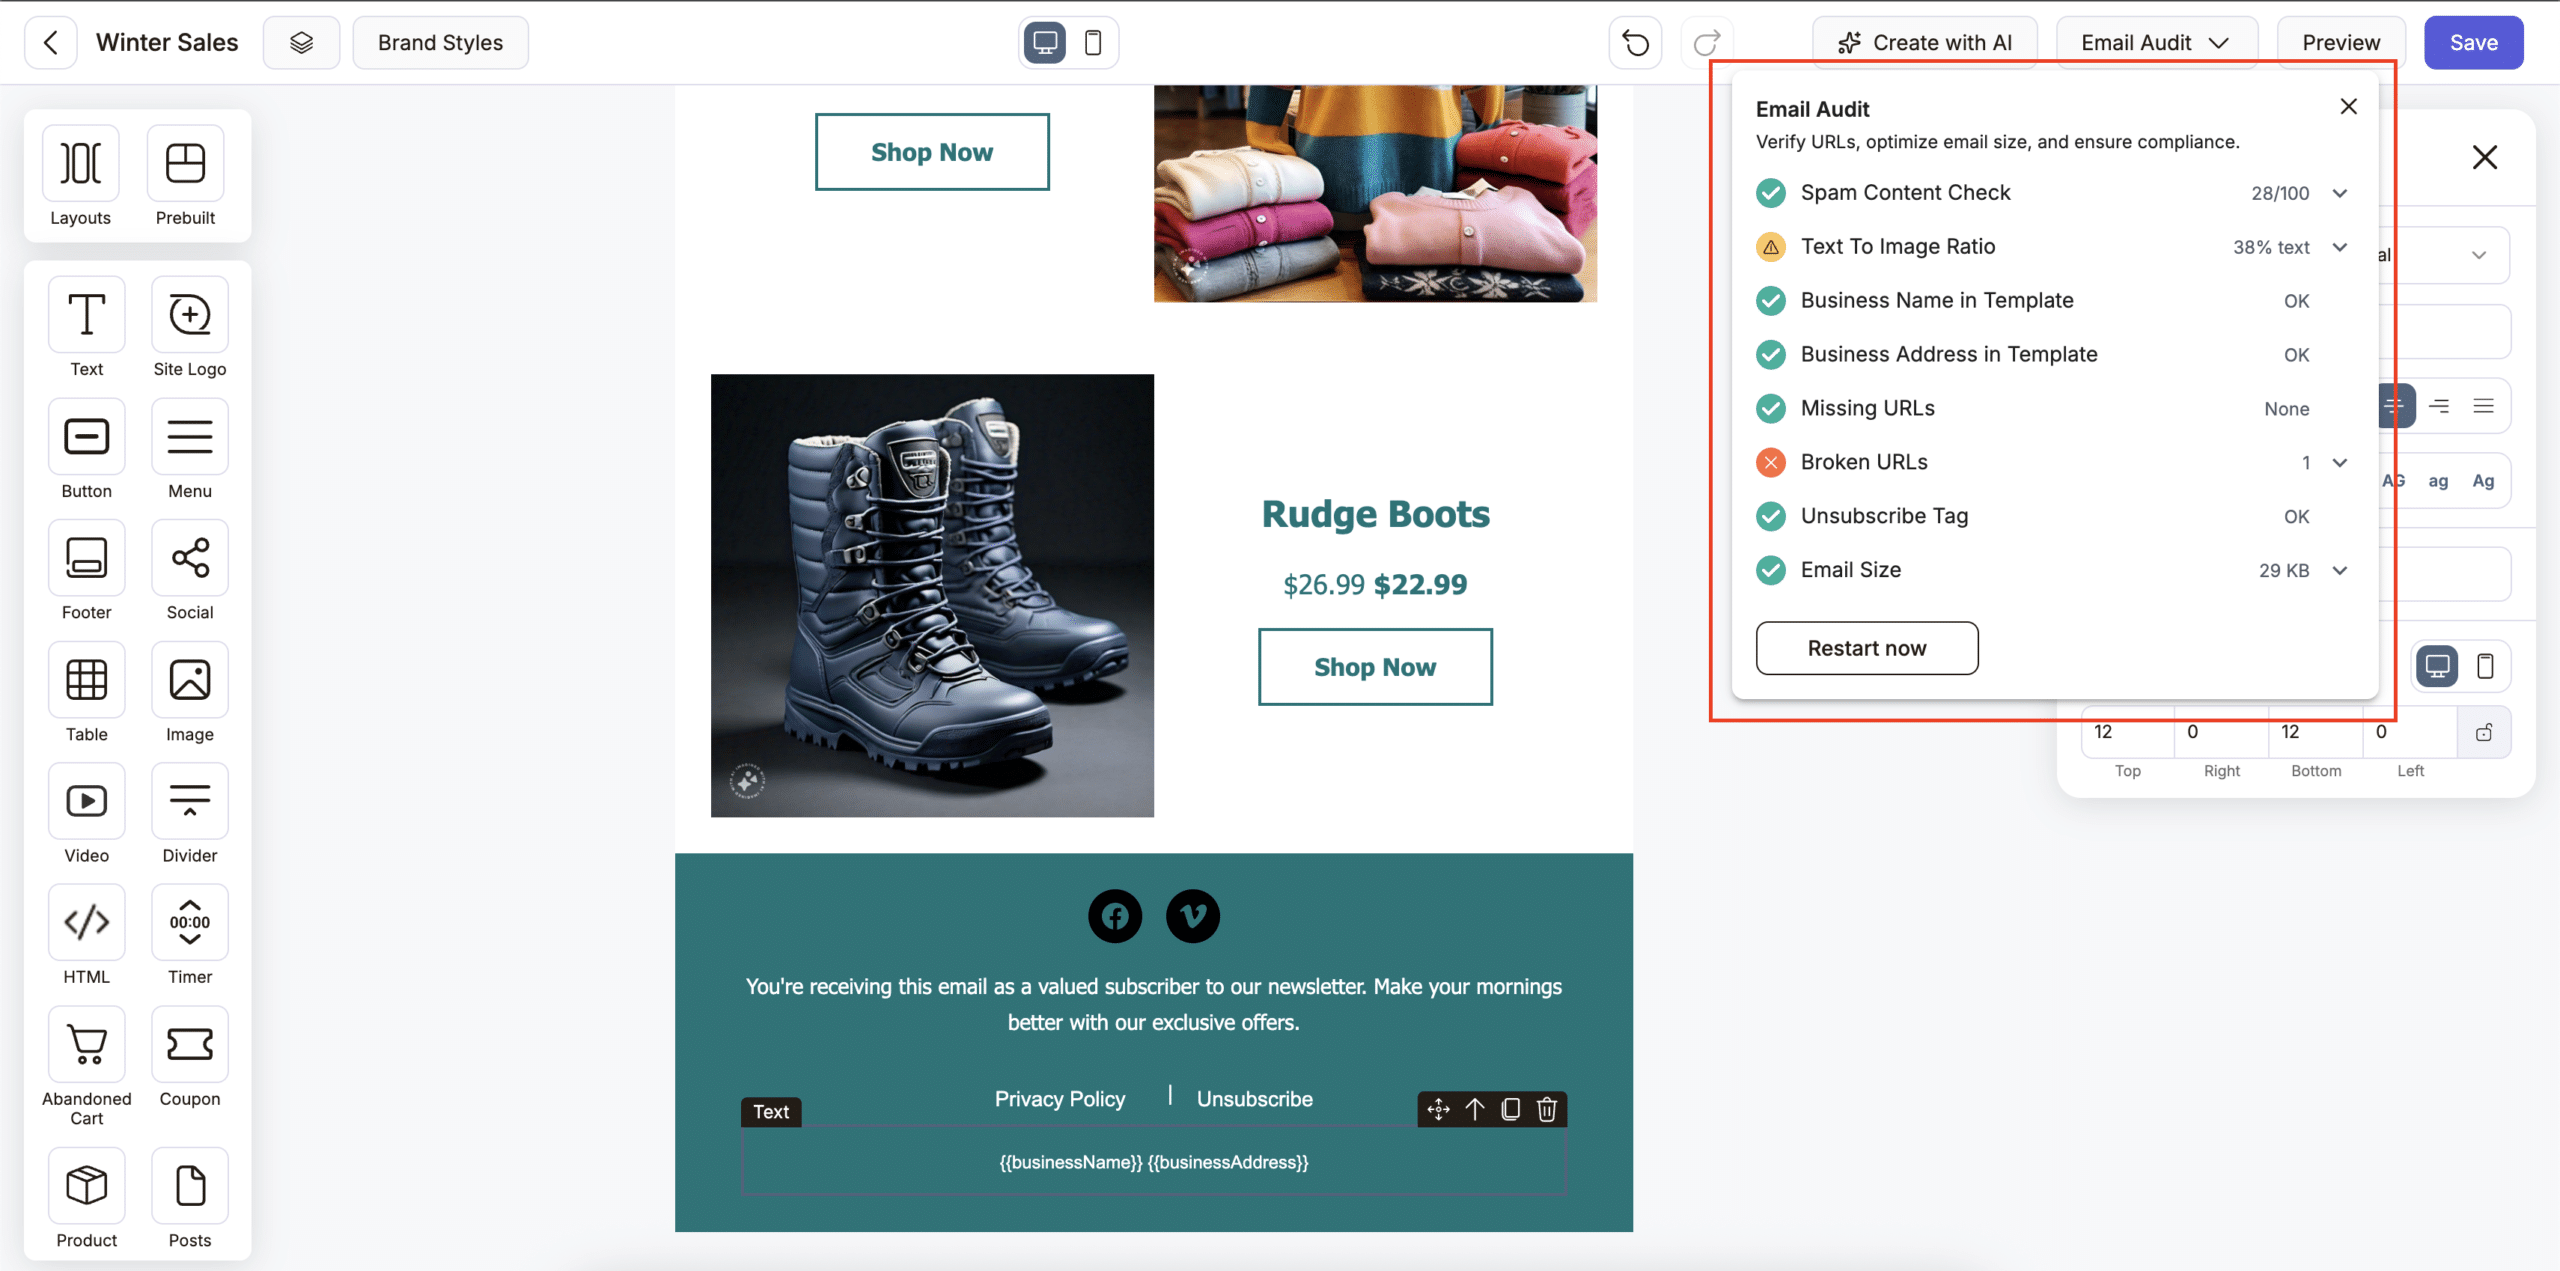
Adflipr’s email auditor, included in the Premium plan, checks your template against 8 parameters before you send:
- Spam content check
- Text-to-image ratio
- Business name in template
- Business address in template
- Missing URLs
- Broken URLs
- Unsubscribe tag
- Email size
Passing all 8 lowers the risk of your email going to spam and gives it a better chance of reaching the inbox. It cannot guarantee inbox placement. Not on Premium? Scan your email HTML with the free email auditor tool, and read the details in our email marketing audit checklist.
Then send a test to yourself and check it on your phone before you click Send or Schedule. Your own data is the best guide for timing; see best time to send email marketing.
How to Create an Automated Email Campaign
An automated campaign sends by itself when a customer does something, like joining your list or leaving a cart. To create one:
- Choose the trigger, such as a signup or an abandoned cart.
- Add your emails.
- Set the delay between them.
- Activate it. It then sends automatically.
Start with a welcome series and an abandoned cart flow. Learn more about email automation, then set one up with Adflipr automations and abandoned cart recovery.
Review the Results
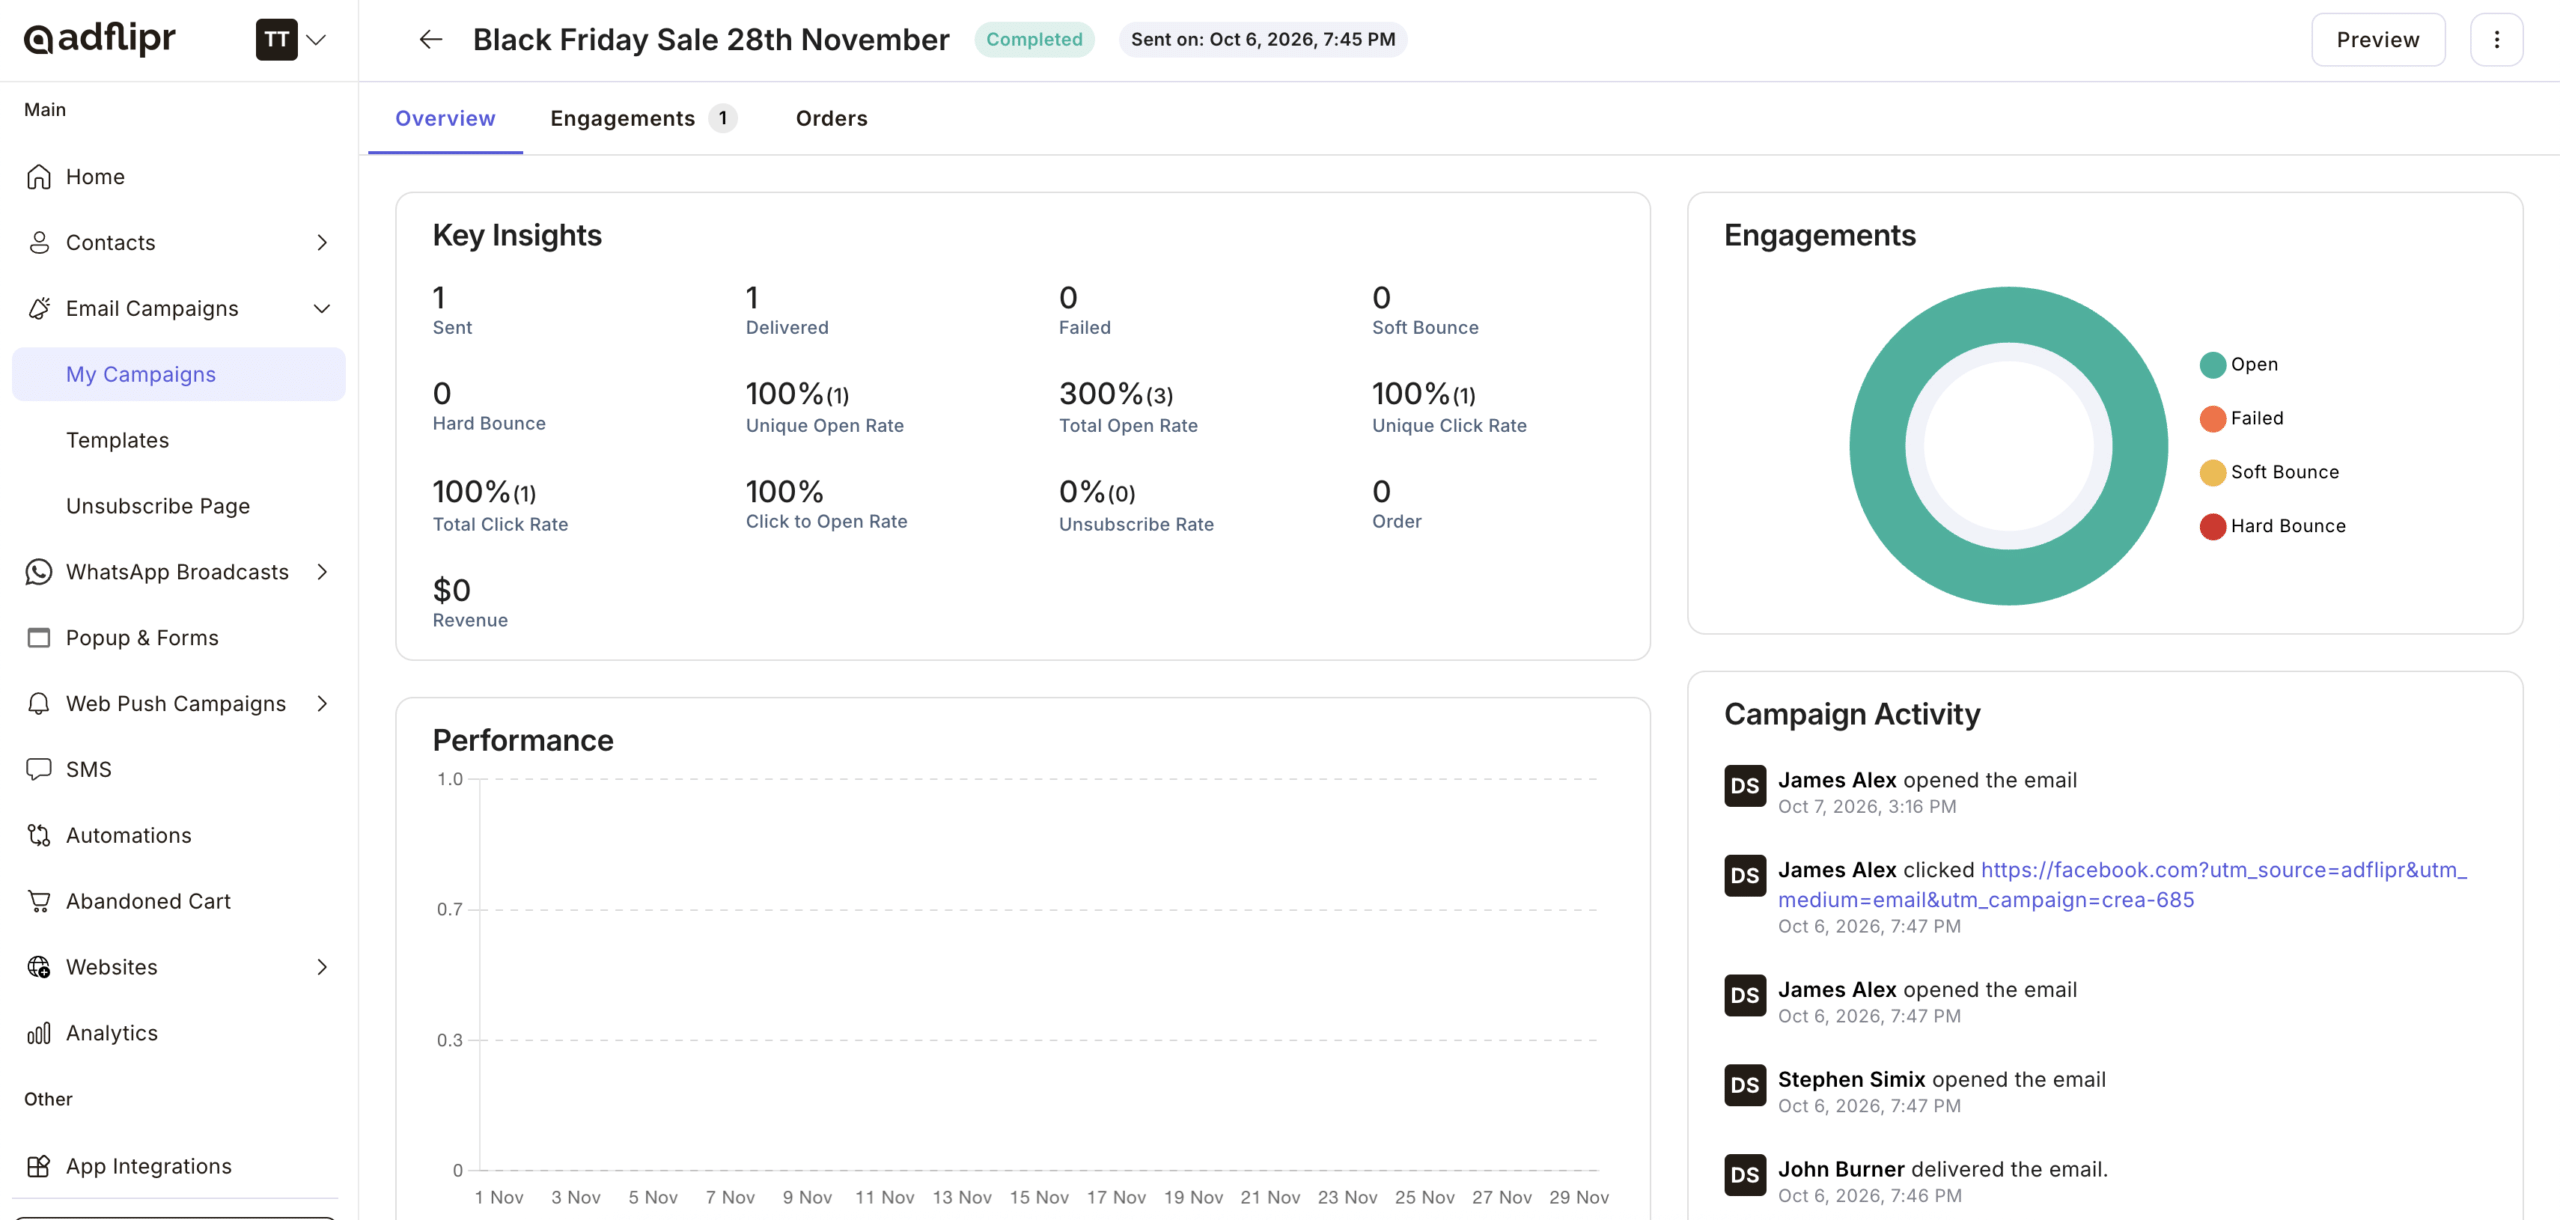
Results start showing as soon as you send. Within 24 hours you get a clear picture of how the campaign performed: clicks, orders, unsubscribes and complaints. Judge success by clicks, orders and revenue per email, not opens, since Apple Mail Privacy Protection inflates open rates. Write down one thing to change next time.
For ranges by industry, see email marketing metrics and benchmarks, and for what to track, email marketing analytics. If delivery is the problem, read why emails go to spam.
Email Campaign Examples for Online Stores
| Store | Campaign type | Audience | Subject example |
|---|---|---|---|
| Fashion (Shopify) | Promotional sale | Past buyers | “48 hours: winter styles, 20% off” |
| Home goods (WooCommerce) | Product launch | All subscribers | “New: our spring collection is here” |
| Beauty | Repeat purchase | Bought 45+ days ago | “Time to refill?” |
| Any store | Early access | VIP customers | “You shop first: early access starts today” |
| Any store | Win-back | No purchase in 90 days | “We saved something for you” |
| Any store | Black Friday | Engaged subscribers | “Early access: Black Friday starts for you today” |
These are illustrative examples, not results. For more, see our email campaign examples and the Black Friday email marketing guide.
What to Look for in an Email Campaign Builder
Whether you use Adflipr or another email campaign creator, check five things:
- Store sync with Shopify or WooCommerce
- Segmentation to send to the right people
- A drag-and-drop editor with mobile-friendly templates
- Automations such as welcome and abandoned cart emails
- Reports that show orders, not only opens
How to Create an Effective Email Campaign: Do and Don't
| Do | Don’t |
|---|---|
| Set one goal and one main button per email | Mix a sale, a blog link and a survey in one email |
| Send to a segment that fits the offer | Send every email to your whole list |
| Write a short, benefit-led subject line | Use vague or misleading subject lines |
| Audit the email and send a test first | Send without checking links and the unsubscribe tag |
| Judge results by clicks and orders | Judge success by opens alone |
| Keep campaigns and automations from overlapping | Send a campaign and an automation to the same people at once |
How Often Should You Send Email Campaigns?
There is no universal number. A common starting point is one or two campaigns a week. Then adjust by watching unsubscribes, complaints and sales. If complaints or unsubscribes rise, send less or tighten your segments.
How Adflipr Can Help You Create Email Campaigns
Ready to send your first campaign?
Email builder and templates
A no-code drag-and-drop builder with Shopify and WooCommerce product blocks.
Segments
Group contacts by behavior and purchase history with contact management.
Automations
Ready-made flows for welcome, abandoned cart and repeat purchases.
Free tools
A subject line generator and an email auditor.
Reports
Analytics and reporting that show clicks and orders per campaign.
Key Takeaways
- Creating a campaign is six steps: create it, then sender, audience, subject line and preview text, template, and send or schedule.
- Set up your domain and sender first, so your emails are authenticated.
- Audit the email before every send, then check clicks and orders afterwards.
- Start with one clear goal and one main button per email.